This article will give very thorough and simple, step-by-step, instructions on how to tie the four main neck tie knots: Windsor Knot (aka Double Windsor Knot), Half Windsor Knot, Four-in-Hand Knot, and the Pratt Knot. Each tie knot gets its own section with step-by-step instructions, each step includes a diagram, and there is also at least one (sometimes two) videos showing someone tying the knot from beginning to end. There is no way, no how, that you could possibly be unable to tie any one of these knots after reading this article 😀 .
Before You Begin
These instructions assume that you are right-handed and standing in front of a mirror (do the diagrams seem to be ‘in reverse’ to you? Remember, they’re showing you what you should look like in the mirror). If you are left-handed, you can simply reverse the two ends. You’ll still end up with the same tie knot. Also, these steps include pulling the collar down after you drape the necktie around your shoulders. You can leave the collar up until after the last knot is finished if you prefer.
First, button up your dress shirt (even the top button), then pull the collar straight up all the way around. This helps you make sure the tie drapes around your collar in the right place. Now drape the necktie behind your neck, letting the ends fall over your shoulders.
The Windsor, Half Windsor, and the Four-in-Hand tie knots all begin by draping the necktie around your neck, right-side out. (The Pratt Knot, described later, begins with the necktie seam-side out.)
Notice in the following graphic that the two ends of the neck tie are not the same width. These instructions refer to them as the broad end and the narrow end. To make it easier to follow the steps, the broad end is slightly darker and wider than the narrow end. This graphic also distinguishes the right-side out and the seam-side out positions.


Before you begin the knot, make sure that the broad end of the tie hangs twice as low as the narrow end. This will help you create the right length. (Generally, the broad end of the finished knotted neck tie should extend just to the top of your belt buckle.)
How To Tie A Windsor Knot (aka “Double Windsor” Tie Knot)
The Windsor knot is a large symmetric and triangular
| tie knot that looks best with wide collars, and is typically worn for formal occasions. Thought to project confidence, this thick tie knot is typically worn in business or political settings, and is a good choice for job interviews. The Windsor is, by far, the most popular general tie knot (though the four-in-hand is close). |
Because the Windsor knot is wide and thick, it’s best worn with ties made of thinner materials, such as silk. The wide form of this tie knot is especially popular with men who have longer necks.
First the video, which does a superb job, and then there are written step-by-step instructions with diagrams:
Instructions
1. Stand in front of the mirror and drape the tie over your neck and around the collar so that the broad end drapes over your right shoulder and the narrow end drapes over your left shoulder. The broad end should hang twice as low as the narrow end. Both ends are right-side out.

2. Cross the broad end over the narrow end to form a V close to the neck. (The broad end is now to the left of the narrow end.)

3. Using the thumb and first two fingers of your right hand, gently hold the V in place while you bring the broad end up, under and over the V at the neck, then down to the right. This creates the first part of the knot. (The broad end is seam-side out now)

4. Loosely hold the narrow end with your right hand while you bring the broad end under the narrow end, close to the V at the neck. The broad end is now seam-side out. This creates the second part of the knot.

5. Hold the knot in position between the thumb and first two fingers of your right hand while you bring the broad end to the left, over the knot (and over your two fingers to form a loop). The broad end is right-side out. Continue to lightly hold the knot.

6. Bring the broad end behind the knot, and up between the neck and the knot. Then slip the broad end through the loop being help open with your two fingers. The tying is now complete.


7. Use both hands to straighten the tie and coax the knot up and toward the center. The broad end (on top) should hang lower than the narrow end.

How To Tie A Half Windsor Knot
The Half Windsor knot is a simpler version of the Windsor tie knot, suitable for ties made of light to medium fabrics. Although not as formal as the Windsor, the Half Windsor is a simple triangular tie knot that can be worn with almost any dress shirt.
First, the videos, and then the step-by-step instructions with diagrams:
A second video, which is very good and covers both the Half-Windsor knot and the Four-in-Hand knot:
1. Stand in front of the mirror and drape the tie over your neck and around the collar so that the broad end drapes over your right shoulder and the narrow end drapes over your left shoulder. The broad end should hang twice as low as the narrow end. Both ends are right side out. Pull the collar down.

2. Cross the broad end over the narrow end to form a V close to the neck. (The broad end is now to the left of the narrow end).

3. Using the thumb and first two fingers of your right hand, gently hold the V in place while you bring the broad end behind and to the right of the narrow end. (The broad end is now seam-side out.) This forms the first part of the knot. Continue to hold the knot in place between your fingers.

4. Still holding the knot, bring the broad end up and over the knot and your two fingers, creating a loop. The broad end is now seam-side out and to the right of the narrow end. Continue to hold the knot between your fingers and thumb.


5. Bring the broad end in front of and to the left of the knot and over your two fingers to form a loop.

6. Bring the broad end up and behind the knot at the neck, and the slip it down through the loop held open by your two fingers. The tying is now complete.


7. Use both hands to straighten the tie and coax the knot up and toward the center. The broad end (on top) should hang lower than the narrow end.

How To Tie A Four-in-Hand Knot
The Four-in-Hand is a popular tie knot, and probably
| the easiest to learn, which makes tying a four in hand knot the first choice if you’re very short on time. Unlike the Windsor and Half Windsor tie knots, the Four-in-Hand knot is slightly asymmetrical, and thus less formal. Use this knot for typical button-down dress shirts. Because the knot is not thick, it works best with ties made of |
heavier fabrics. This narrow tie knot is especially popular with men who have shorter necks.
First, the videos, and then step-by-step instructions with diagrams will follow:
A second video, also show earlier for the Half-Windsor, which is very good and covers both the Four-in-Hand knot and the Half-Windsor knot:
1. Stand in front of the mirror and drape the tie over your neck and around the collar so that the broad end drapes over your right shoulder and the narrow end drapes over your left shoulder. The broad end should hang twice as low as the narrow end. Both ends are right side out. Pull the collar down.

2. Cross the broad end over the narrow end to form a V close to the neck. (The broad end is now to the left of the narrow end.)

3. Using the thumb and first two fingers of your right hand, gently hold the V in place while you bring the broad end under and to the right of the narrow end. The broad end is now seam-side out.

4. Still holding the knot in place with your right hand, bring the broad end over and to the left of the narrow end, and over the two fingers of your right hand to form a loop. Continue to hold the knot in place.

5. Bring the broad end up and behind the knot, then slip the broad end through the loop held open by your fingers on the right hand. The tying is now complete.


6. Use both hands to straighten the tie and coax the knot up and toward the center. The broad end (on top) should hang lower than the narrow end.

How To Tie A Pratt Knot
The Pratt knot is sometimes incorrectly referred to as the Shelby knot. The name is derived from the inventor of the knot, Jerry Pratt. Not quite as wide as the Windsor knot, the Pratt knot looks well with almost any dress shirt. Because it is fairly wide, however, it’s better used with ties made of light or medium fabrics.
Larger than the Four-in-Hand knot but smaller than the Half Windsor, the Pratt knot is neat and symmetric. It’s suitable for most shirts and for most occasions.
Of the four knots listed here, the Pratt knot is the only one that begins by draping the tie over your collar seam-side out.
First, the video, and then the step-by-step instructions with diagrams:
1. Stand in front of the mirror and drape the tie over your neck and around the collar so that the broad end drapes over your right shoulder and the narrow end drapes over your left shoulder. The broad end should hang twice as low as the narrow end. Both ends begin seam side out.

2. Bring the broad end under the narrow end and to the left. This forms a V close to the neck.

3. Using the thumb and the first two fingers of your right hand, gently hold the V in place while you bring the broad end up and over the V at the neck, ending to the left of the narrow end. This creates the first part of the knot. (Both sides are still seam side out.) Continue to hold the knot in place.


4. Bring the broad end to the right, over the knot (and over your two fingers to form a loop). The broad end is now right-side out. Continue to lightly hold open the loop with your fingers.

5. Bring the broad end up and behind the knot, and then slip the broad end down and through the loop. The tying is now complete.


6. Use both hands to straighten the tie and coax the knot up and toward the center. The broad end (on top) should hang lower than the narrow end.

Additional Resources About Neck Ties and Tie Knots:
If you’re really interested in this subject, I highly recommend Thomas Fink’s The 85 Ways to Tie a Tie: The Science and Aesthetics of Tie Knots–this truly is the “bible” of tie knots, with a lot of additional information, background, and history about each knot (with instructions and diagrams for each one, of course).
Wikipedia Article On Neck Ties – Very interesting, includes the history of the first neck ties, called ‘Cravats’, the complicated procedure a gentleman would have to execute to properly tie one, the many different possible knots such as the ‘mathematical’ and the ‘mail coach’, the history and origins of current knots such as the Four-in-hand and Windsor knots, and a lot of good additional information (did you know that some law enforcement agencies require clip-on ties because it would be dangerous for an officer to wear a tie that an assailant could choke them with?). It also mentions health risks associated with ties (glaucoma sufferers beware) and the recognized problem of cross infection between patients due to a doctors tie. Anti-tie sentiment from the 1960’s still carries over to today, especially among technology and internet companies.
Wikipedia Article About the Paisley Design Commonly Found on Ties
The History Of Neckwear, by Alan Flusser Author of several acclaimed men’s fashion books (see all his books on Amazon HERE), including the best-selling Dressing the Man: Mastering the Art of Permanent Fashion
The Straight Dope: What is, or was, the purpose of men’s neckties? – Very interesting article where Cecil takes questions on ties from several people who have written into him, such as one who had an interesting point: “…You fail to consider that the tie is the male’s one opportunity for textile display as flashy as that permitted the female. Women can splash color from neckline to hem. But male shirtings and suitings are evidently designed by some Protestant soul afraid that any color visible at more than two feet will cause moral degeneracy. The tie is a man’s only opportunity to strut his stuff. –James Y., Bethesda, Maryland”
Cecil then proceeds to ask: “Jim, you one of those fashion-mag guys who call those things people wear on their legs a “pant”? 😆
Totieatie.com – Comprehensive website about how to tie a tie as well as further care and cleaning information such as how to clean a tie, how to prevent and remove wrinkles on a tie, and how to iron a tie.
Thomas Fink’s Encyclopedia of Tie Knots – A physicist opines on EVERY conceivable way one could tie a tie – in fact, this guy actually wrote a book called The 85 Ways to Tie a Tie: The Science and Aesthetics of Tie Knots
How to Tie a Tie at eHow.com – This article is way better  but I’ll put it here so you’ve got something else to use and compare with this.
How to Tie a Tie at WikiHow – Again, this article is better, but I don’t want anyone to think I’m excluding them because they’re running a competing site–they’re relevant, therefore they get linked to because the reader might want to see it.
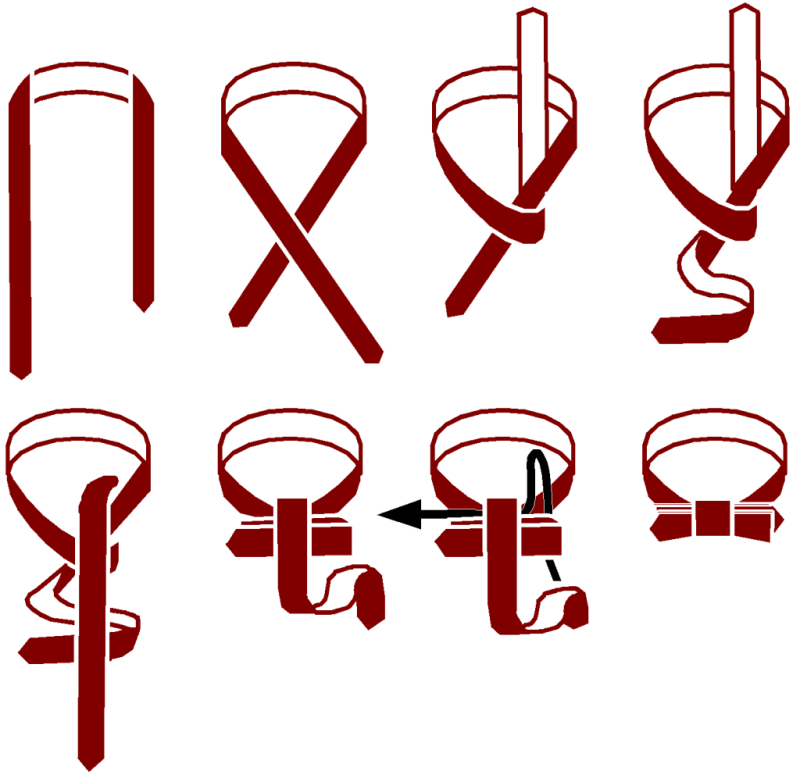
How to Tie a Bow Tie at WikiHow.com – Pretty good article, this one’s got some decent diagrams.
Krawattenknoten.info – Cool site that has a LOT of different tie knots, including lots of obscure ones you probably won’t find information on anywhere else, such as the Half-English Tie Knot, Atlantic Tie Knot, and Turkish Tie Knot.
Other similar ‘How to Tie a Tie’ Websites (same stuff, slightly different flavors):